Create a Blog with Eleventy and Storyblok
Reading time: 24 minsThis is the third post in a series of articles called "Eleventy and Storyblok" to learn how to use this combination to create a web project.
TL;DR: Too much text for you? Don't worry! You have all the code described in this tutorial in this template repository: https://github.com/guaca/11ty-storyblok-template/.
Keep in mind, however, that you will need to create your .env file with the proper variables described in this article for the template to work.
Now that you're familiar with why Eleventy + Storyblok is my ideal combination and how to seamlessly query data from Storyblok for use in an Eleventy project, it's time for the next exciting step: let's embark on creating a complete blog site using these two phenomenal technologies!
Creating the Blog Architecture in Storyblok #
The desired blog content architecture has the following levels:
├── Homepage
├── articles
│   └── article-1
│   └── article-2
│   └── article-n
├── categories
│   └── category-1
│   └── category-2
│   └── category-n
└── authors
    └── author-1
    └── author-2
    └── author-n
So first you need to create a new site in Storyblok (you already learned how to do this in my previous article). Got it? Then let's create the data architecture and some initial content in it!
Removing the boilerplate content #
Remove the default content that Storyblok adds when you create a new site. We will create the blocks and stories we need from scratch.
Creating the initial Blocks: Author and Category #
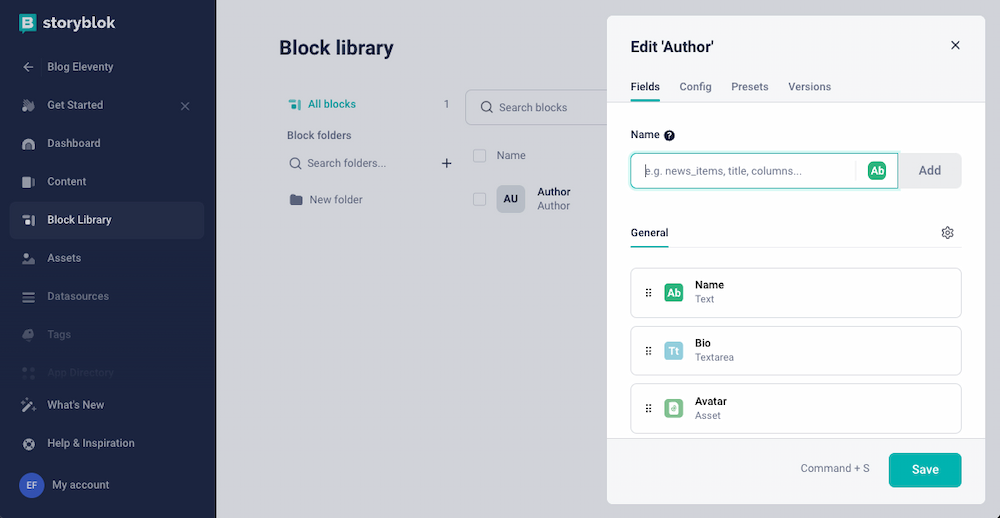
Let's start by creating the Author type. To do this, go to the Block Library (which should be empty if you have deleted all the default blocks) tab and create a new block named Author. Select the option Content type block.
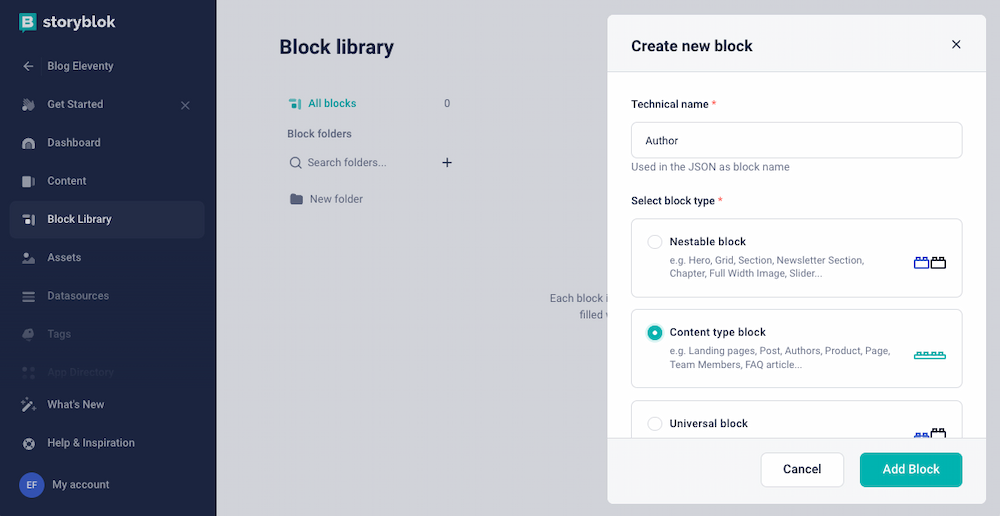
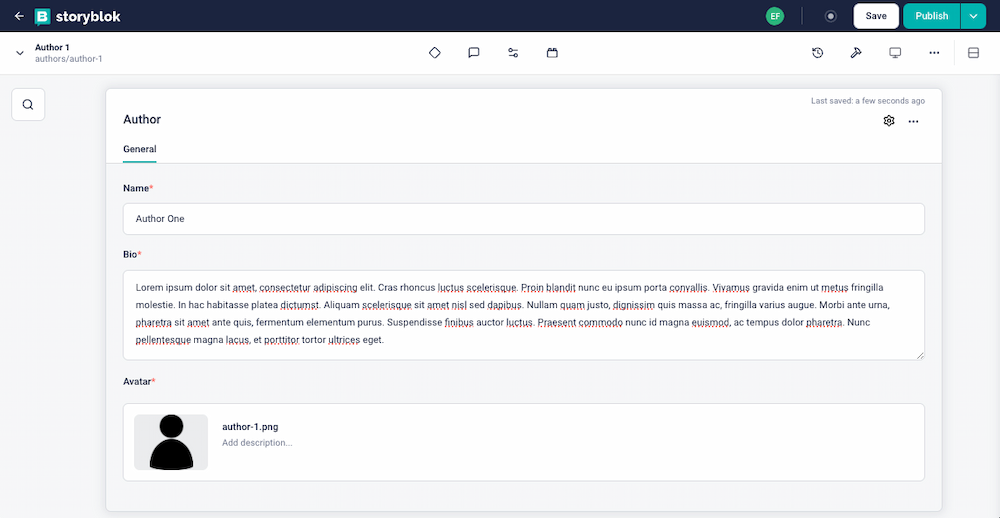
Let's edit it and define the required fields:
- Name (text)
- Bio (textarea)
- Avatar (asset - images)
Remember to mark them as Required field if they are mandatory.
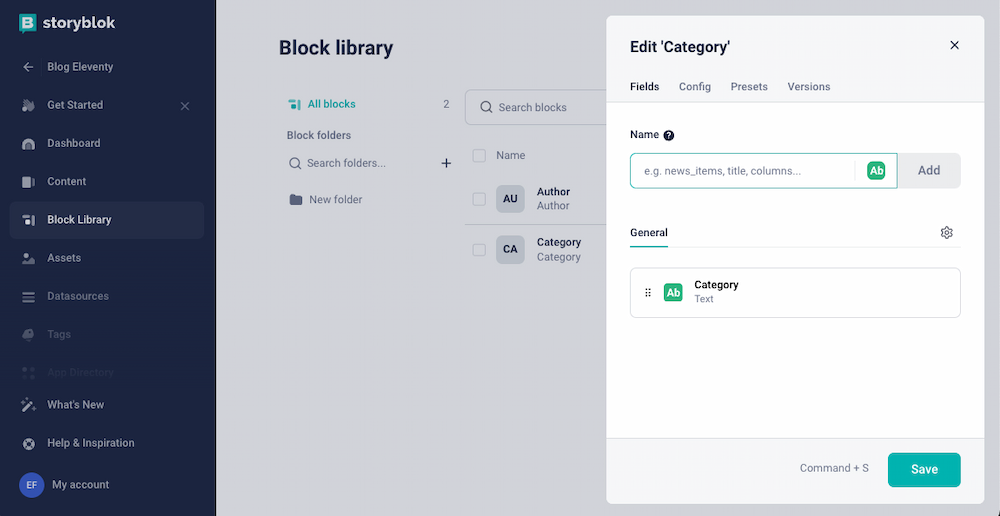
Let's repeat the process to create the Category type. Still in the Block Library, create a new Content type block type. In this case, the name is Category.
In this case, and to keep it simple for this tutorial, I have only defined one field called (surprise) Category.
Creating the first stories: Authors and Categories #
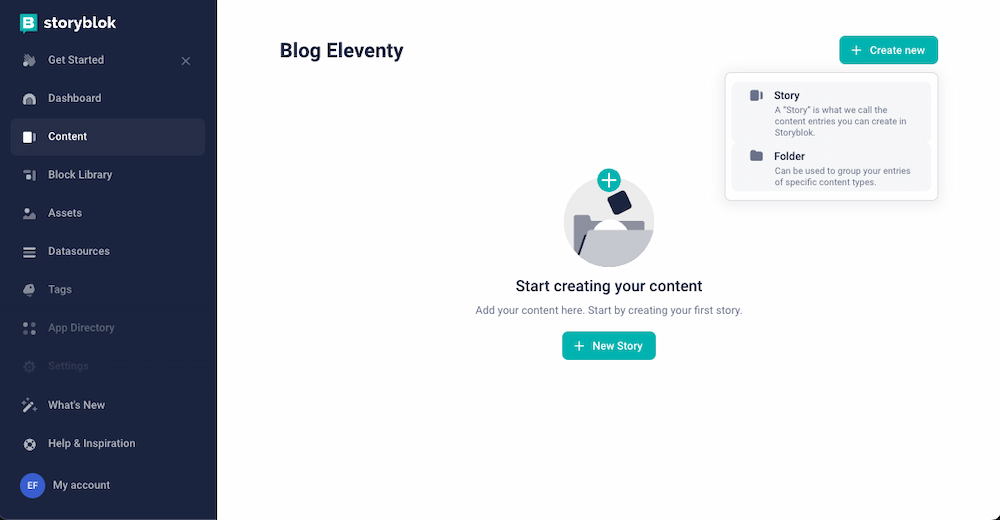
Now that we have created two content types, let's create the first stories! To do that, go to the Content section (which should be empty) and create a new Folder.
Let's start with the Authors! During the definition of the folder, restrict the content type to Author. I also recommend you to check the Disable visual editor (Form only) as we won't use the visual editor in this tutorial.
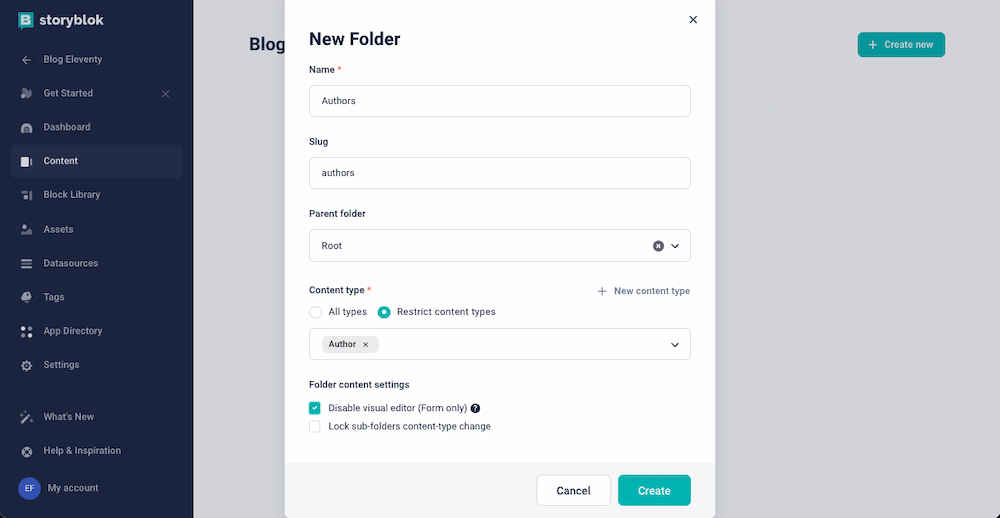
You're now inside the (empty) Authors folder. Create a new Story. The pop-up will ask you for some basic data:
- Name (required). Let's create the
Author 1. - Slug (it's generated based on the name).
- Parent folder. In this case, the Authors folder is the parent folder.
- Content type (required). Select
Author.
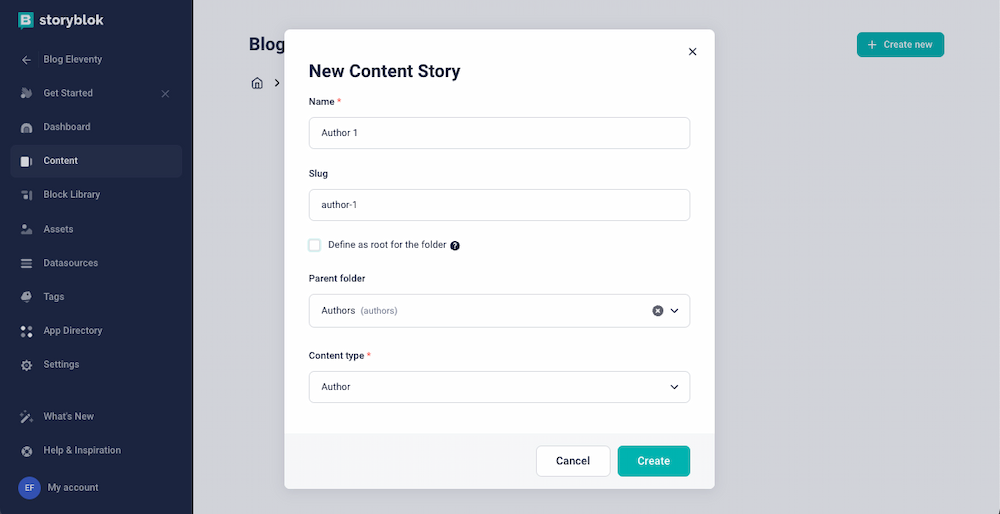
In the next screen, you will see the form with the fields that we defined when creating the Author type. Fill them and hit Save.
You can repeat the process and create some more authors. In my case, I have created another one, called (surprise) Author 2.

Let's now move on and create some Categories. You can repeat the process and create the Categories folder, which should be restricted to the Category content type. Remember to check the Disable visual editor (Form only) checkbox as we're not using this feature in this tutorial.
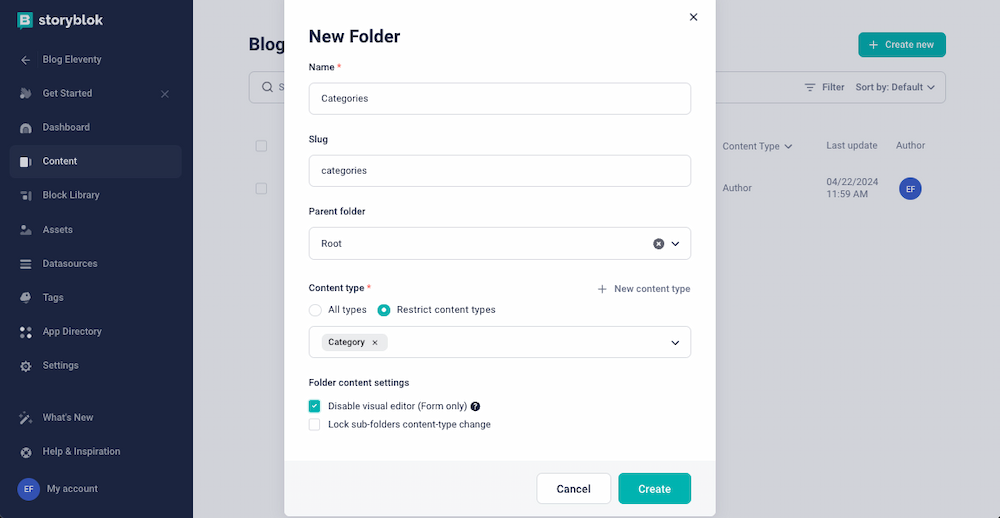
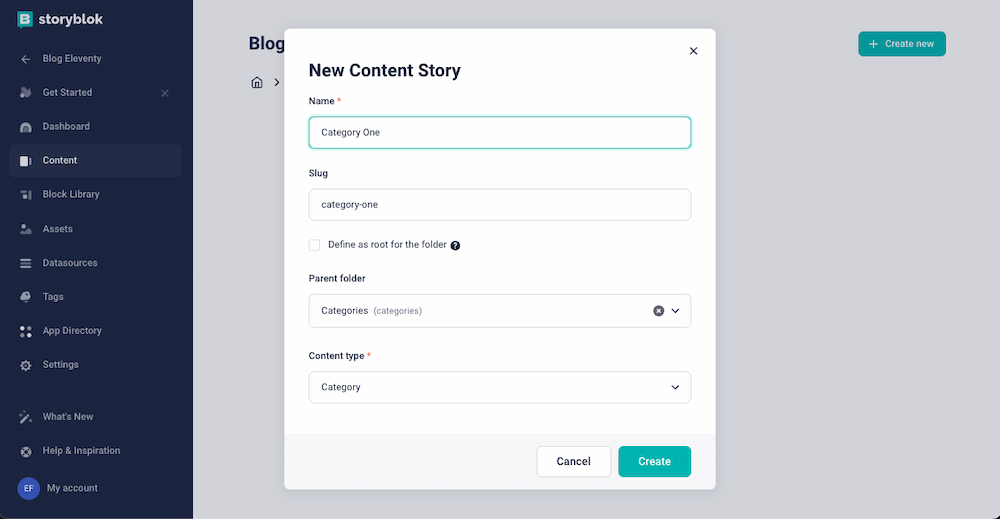
Now that you're inside the Categories folder, create a new story. In this case, it also asks you for some basic information:
- Name (required). For this example, I'm super creative and I have created the
Category One. - Slug (it's generated from the name).
- Parent folder: Categories.
- Content type: Select
Category. - In the next screen, you will see the category form asking for the
Category. In this basic example, this field is alsoCategory One.
And what about the Articles? #
Yes, I know. This is supposed to be a blog site, but I haven't covered the articles yet, right? That's because we're going step by step. And this is the step to start creating Articles.
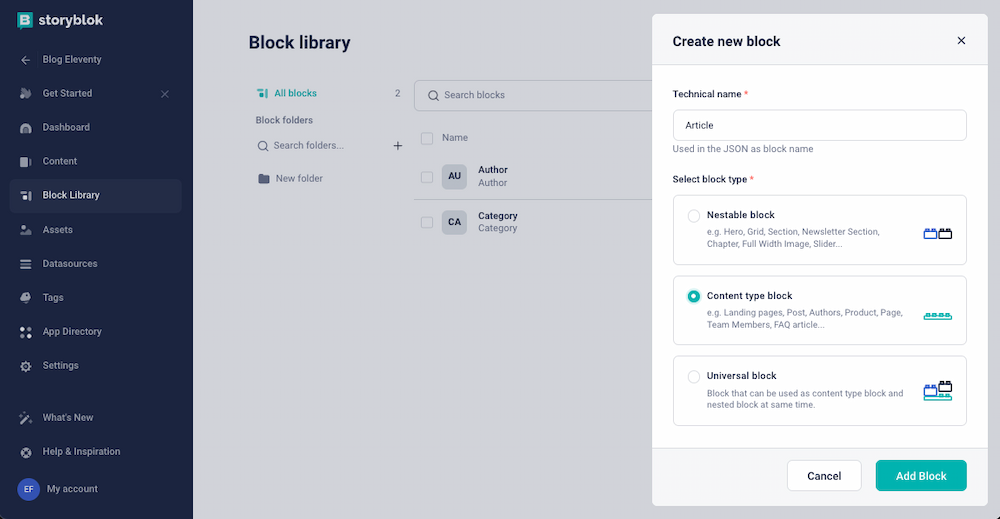
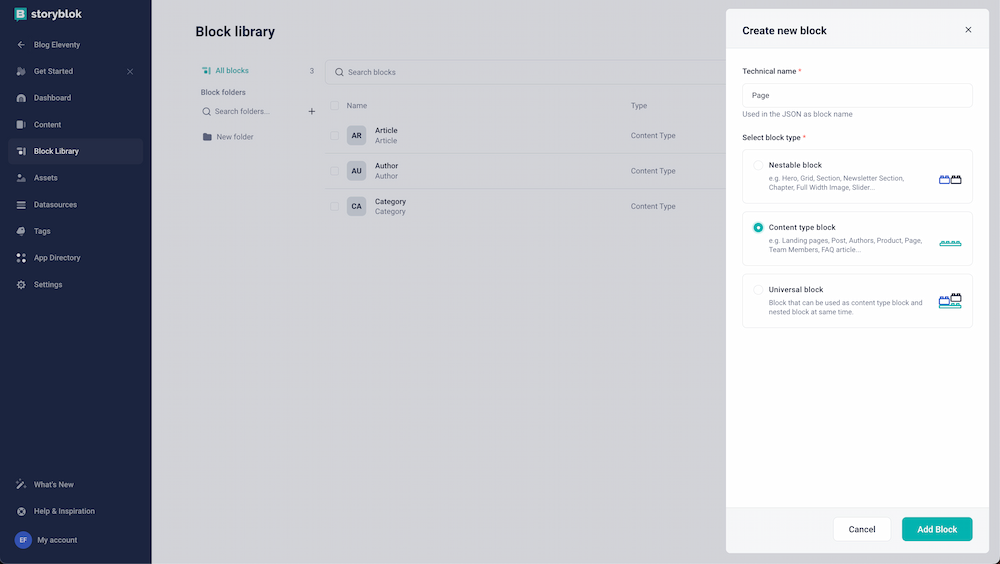
Let's start by creating the Article content type. Remember how to do this? Correct! Go to the Block Library and create a new Block.
- Technical name: Article.
- Select block type: Content type block.
And press
Add Block.
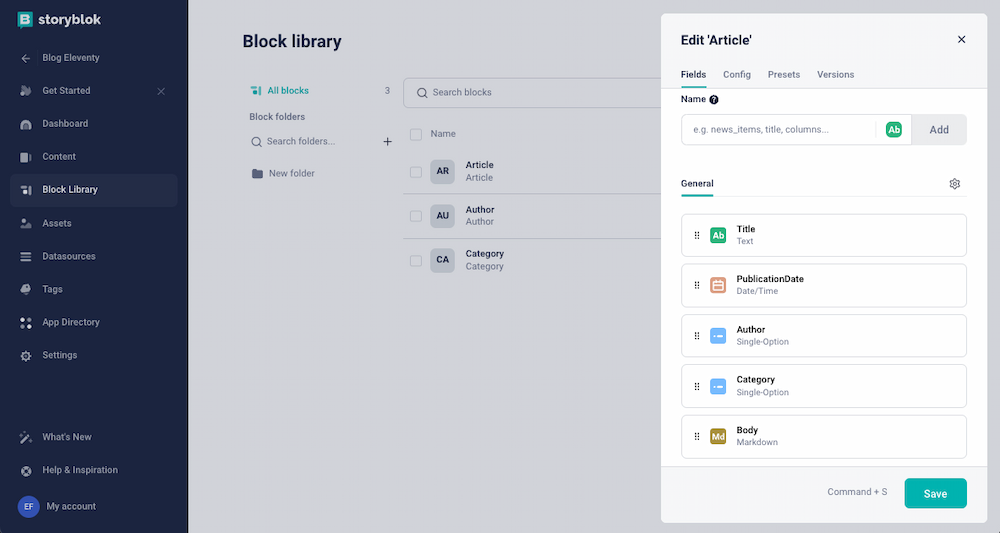
Now edit it to add the fields.
- Title: Text.
- PublicationDate: Date/Time.
- Author. And that's why we created the authors first! Choose the
Single-Optiontype and choose the following source details:- Source: stories
- Path to the folder of stories: authors/
- Restrict to content type: Author
- Category. Similar to what we have done for
Author. It is also aSingle-Optiontype and these are the source details:- Source: stories
- Path to the folder of stories: categories/
- Restrict to content type: Category
- Body. Select
Markdown, but check theRich-text as defaultcheckbox. This will allow you to have a WYSIWYG interface, but it will be saved (and served) as Markdown. As I mentioned in the first article of this series, Markdown is one of the template languages that you can use in your project. Therefore, choosingMarkdownwill be easier to manage than using theRichtextoption.
And you already have the Article block created!
Let's now create the first article. Go to the Content section and create a new Folder called Articles:
- Name: Articles.
- Slug (it's generated from the Name).
- Parent folder: Root.
- Content type: Restrict content types to Articles
Once again, remember to disable the visual editor (Form only).
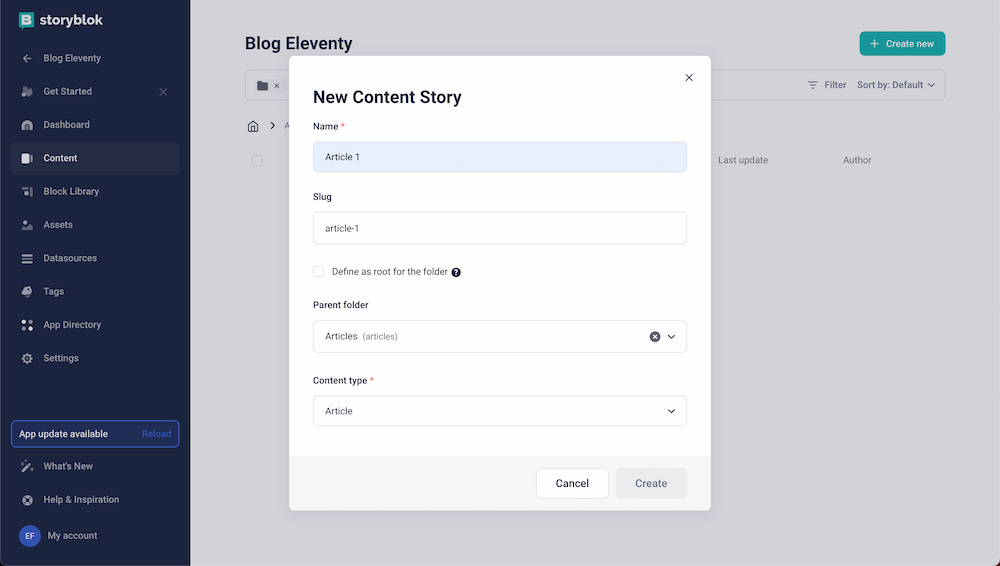
And now you will see the form to create your first article. You've seen that I am being very creative with the content I'm using in this new blog site, so you won't be surprised by my first article:
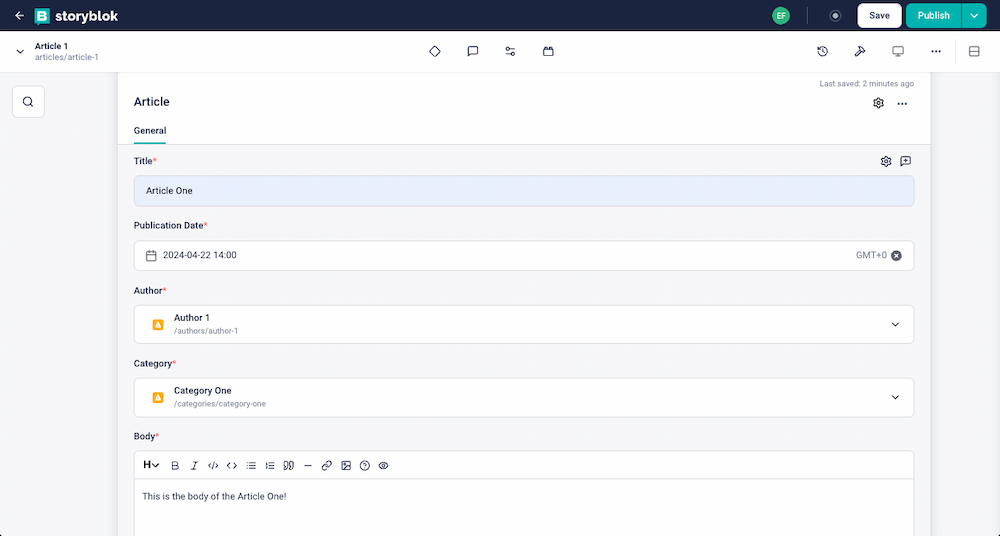
As you can see, the Author and Category were selected from the drop-down list.
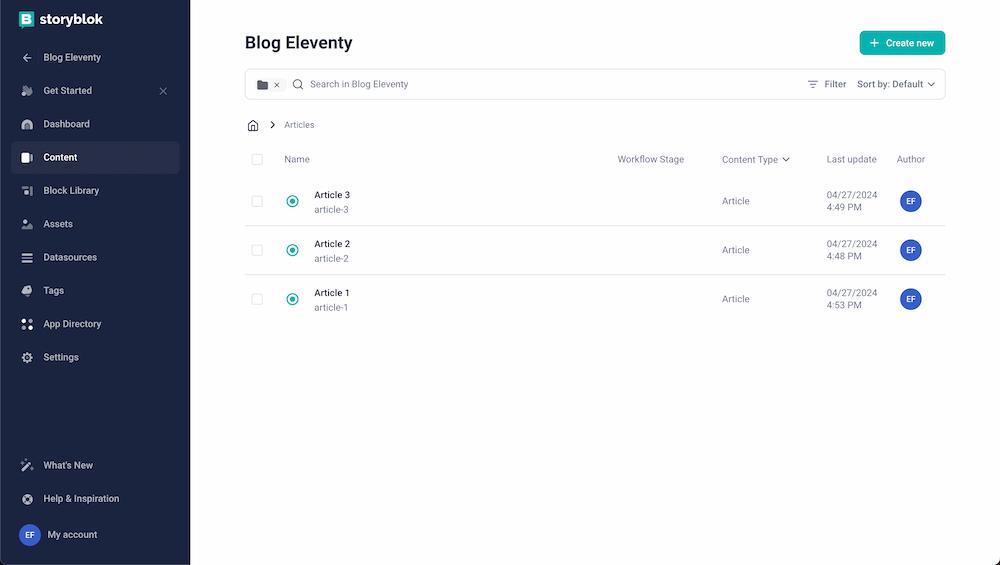
You can repeat these steps to generate a few more articles. I have created a total of 3 articles for this tutorial.
Creating a Homepage #
Last but not least, we need a homepage for our brand new blog site. You've seen how creative I've been with the rest of the content. So, the homepage can't be any different!
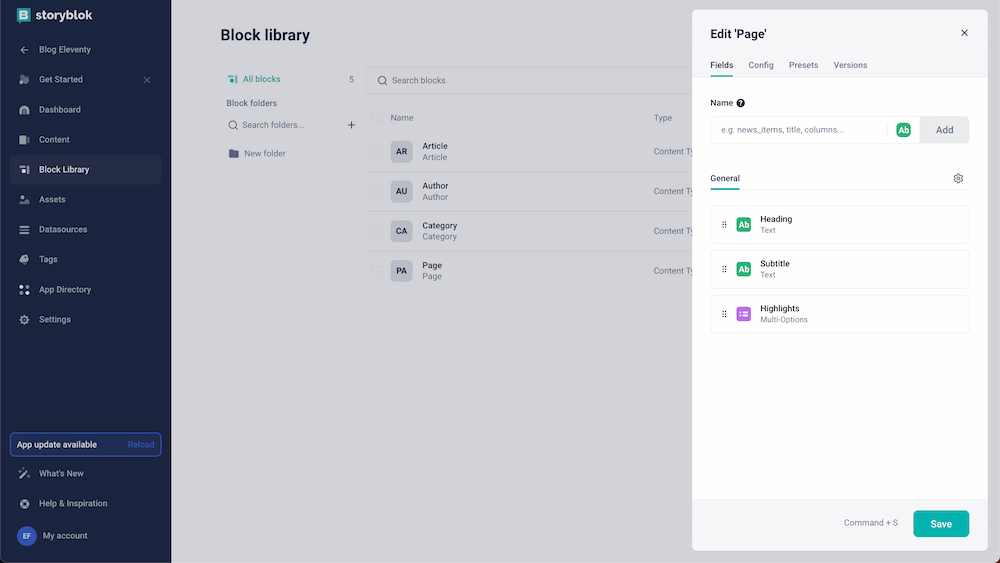
Let's create the Block first. As usual, go to the Block library and create a new one with the following information:
- Technical name: Page (I used this, but feel free to use whatever works better for you).
- Select block type: Content type block.
And now, let's define the fields:
- Heading: Text.
- Subtitle: Text.
- Highlights: Multi-Options
- Source: Stories
- Path to folder of stories: articles/
- Restrict to content type: Article
- Minimum: 3
- Maximum: 5
So, our homepage will have a heading, a subtitle and a list of the top articles.
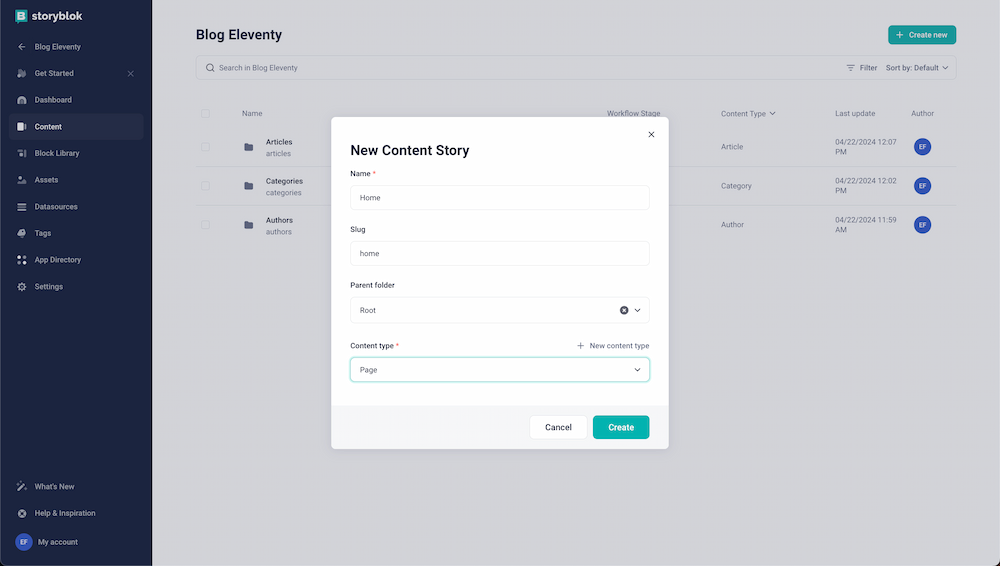
Let's now create the homepage content. Go to Content, create a new Story and the pop-up will ask you for some basic information:
- Name (required)
- Slug (it's generated from the name)
- Parent folder: Root
- Content type: Page
On the next screen, you will see the visual editor enabled. This is happening because Storyblok does offer to disable the visual editor when creating a Folder, but not when creating a Story. Let's disable it as we're not going to use it in this tutorial.
To do it, access the Entry configuration from the navbar above the visual editor. This will open a pop-up and you will see the Edit mode options. Check the Form-only one.
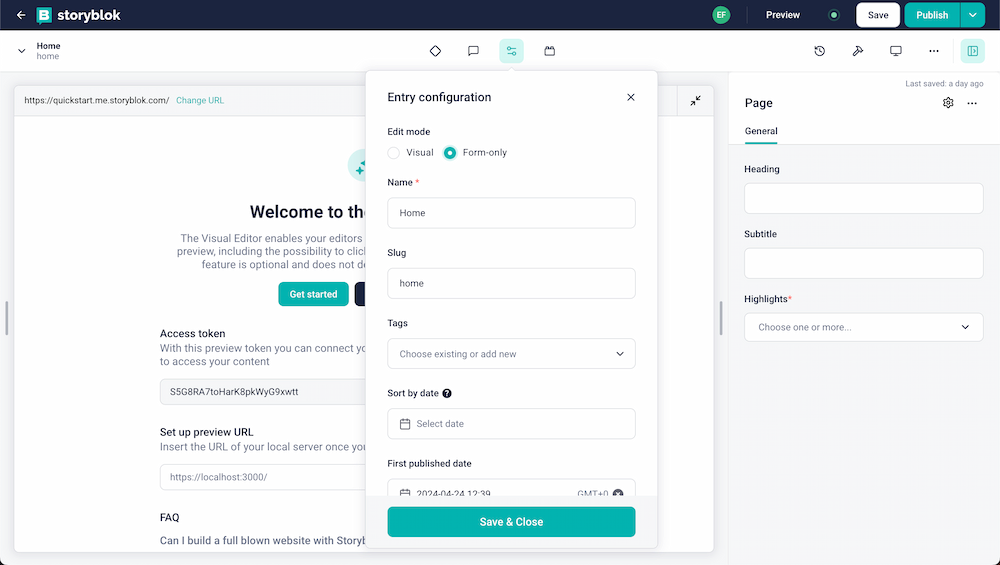
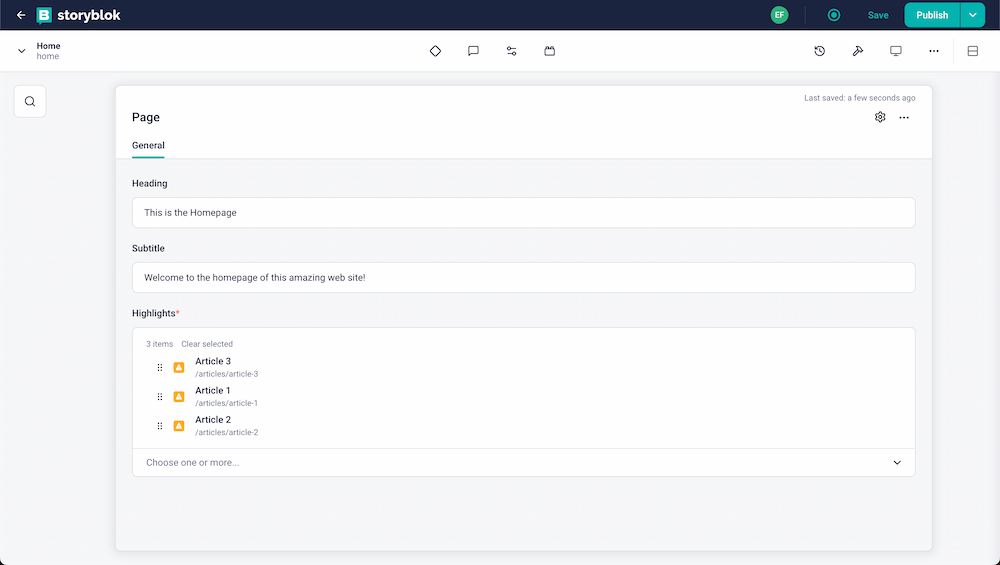
Ok, it looks easier this way, right? Let's fill the fields with my already-famous creative content:
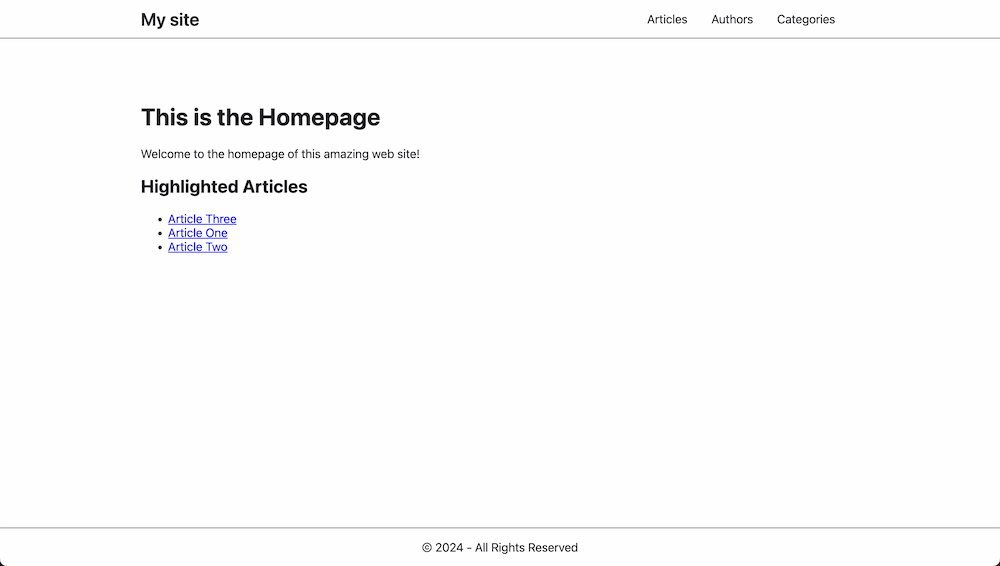
- Heading: This is the Homepage
- Subtitle: Welcome to the homepage of this amazing web site!
- Highlights: In my example, I created 3 articles and I will select them all. An important detail: it's a reordable drag-and-drop list, so feel free to sort them however you like.
And that's it! You have your headless CMS created and ready to generate new content.
Wait. And what about SEO? #
If this question has crossed your mind, THANK YOU! Because we need more people who care about making our sites "SEO friendly" since the first stage of the project.
And if you haven't thought about it, don't worry. I'm here to add this topic just in time.
Create the SEO block #
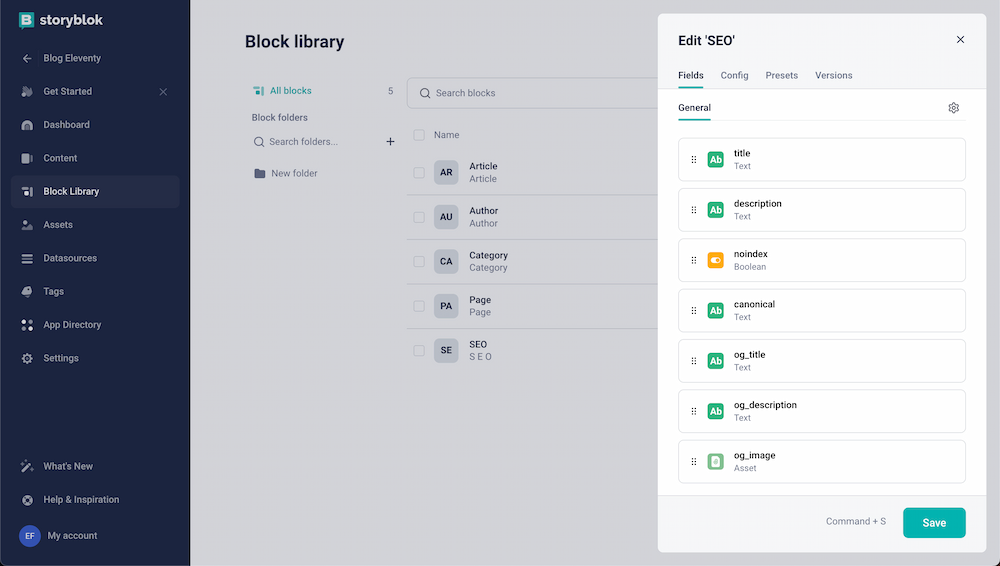
Let's go to the Block Library and create a new nestable block. Call it SEO. Define a minimum and maximum of 1 block.
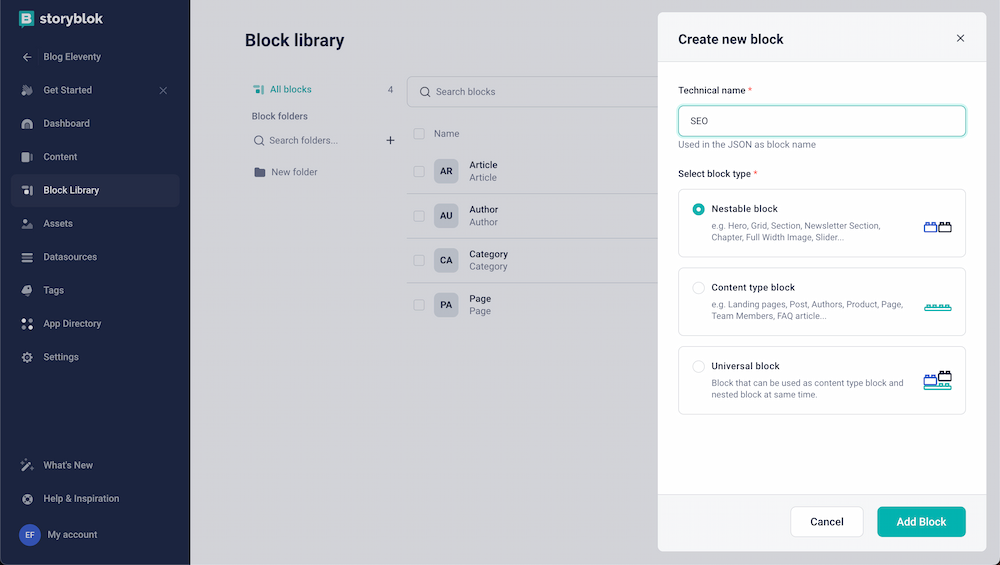
Add the following fields:
- title: text.
- description: text.
- canonical: text.
- noindex: boolean. The default value will be disabled.
- og_title: text.
- og_description: text.
- og_image: asset (image).
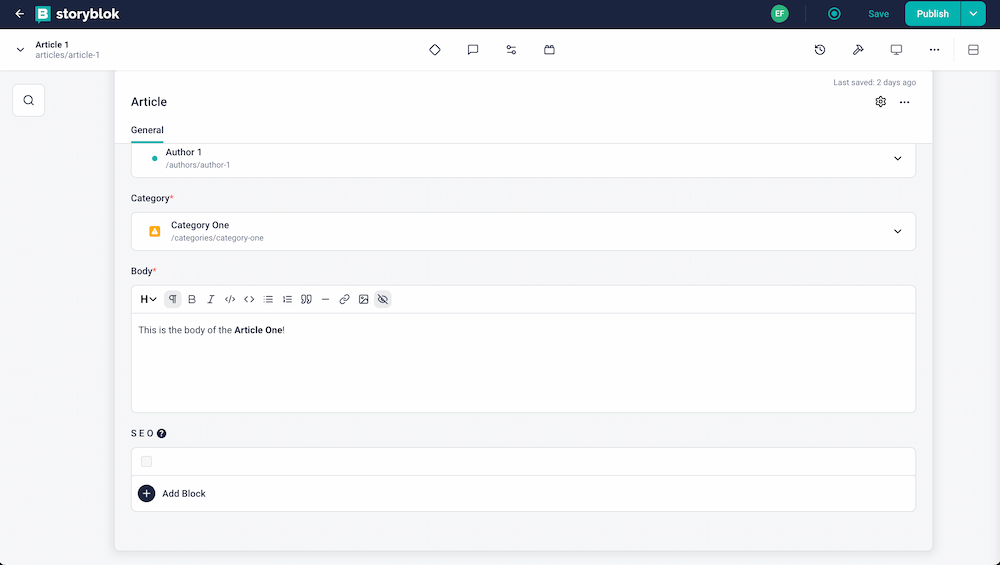
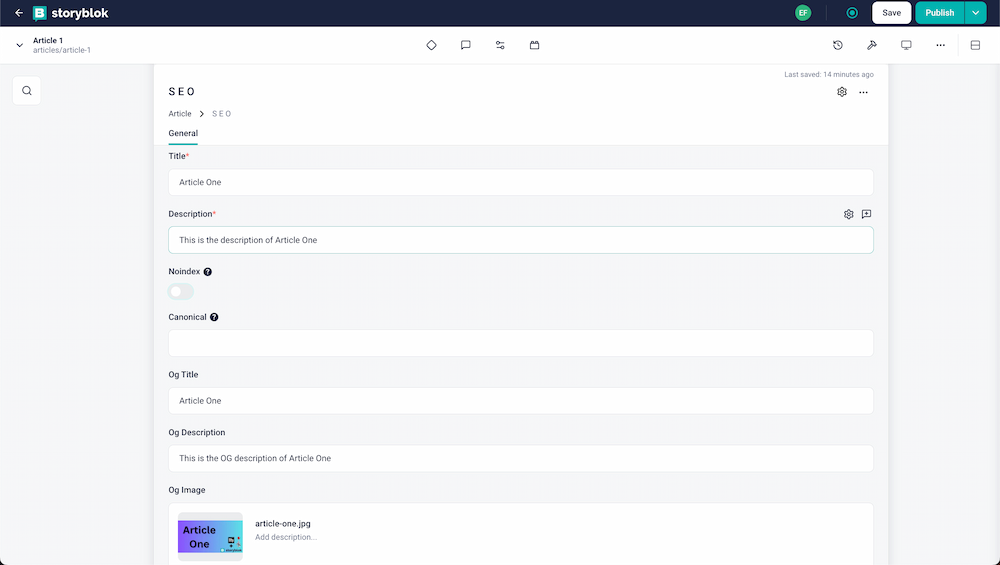
Add the SEO block to the other blocks #
We want to be able to define the proper SEO and Social Media data for all the stories we have already created, so we need to add it to the related content types:
- Article
- Author
- Category
- Page
Once you've added the SEO block to them, you can access the content and add the SEO data:
Creating the Eleventy project #
Alright, you've got the content, but now it's time to build the site that will put that content to use, right? The following steps will help you achieve the desired project structure:
├── src
│   └── _data
│   │    └── articles.js
│   │    └── authors.js
│   │    └── categories.js
│   │    └── home.js
│   │    └── metadata.json
│   └── includes
│   │    └── layouts
│   │    │    └── base.njk
│   │    └── footer.njk
│   │    └── head.njk
│   │    └── header.njk
│   └── public
│   │   └── css
│   │       └── styles.css
│   └── utils
│   │   └── storyblok.js
│   └── article-page.njk
│   └── articles-list.njk
│   └── author-page.njk
│   └── authors-list.njk
│   └── category-page.njk
│   └── categories-list.njk
│   └── index.njk
└── eleventy.js
└── .env
└── .gitignore
└── package.json
Setting up and configuring the Eleventy project #
You already learned how to do this in my previous article, so I'll make it faster this time.
1. Create and access your project (and open it using VSCode) #
mkdir myproject
cd myproject
code .
2. Create your
package.jsonfile in the root directory and paste the following lines: #
{
 "scripts": {
   "build": "npx @11ty/eleventy",
   "start": "npx @11ty/eleventy --serve"
 },
 "devDependencies": {
   "@11ty/eleventy": "^2.0.1",
   "dotenv": "^16.4.1"
 }
}
3. Install dependencies #
npm install4. Create the
.envfile in the root directory #STORYBLOK_API_KEY="[your-storyblok-token-goes-here]"
DOMAIN="[your-website-domain-goes-here]"5. Create the
eleventy.jsconfig file #require('dotenv').config()
module.exports = function (eleventyConfig) {
// Add the .env domain as GlobalData to use in SEO meta data
eleventyConfig.addGlobalData("domain", process.env.DOMAIN );
// Add the current year ad GlobalData to use in the footer
eleventyConfig.addGlobalData("year", new Date().getFullYear())
// Filter articles by Author slug
eleventyConfig.addFilter("filterArticlesByAuthor", function(articles, authorFullSlug) {
const filteredArticles = articles.filter(article => {
return article.content.Author.fullSlug === authorFullSlug;
});
// Sort the filtered articles by PublicationDate in descending order
filteredArticles.sort((a, b) => {
return new Date(b.content.PublicationDate) - new Date(a.content.PublicationDate);
});
return filteredArticles;
});
// Filter articles by Category slug
eleventyConfig.addFilter("filterArticlesByCategory", function(articles, categoryFullSlug) {
const filteredArticles = articles.filter(article => {
return article.content.Category.fullSlug === categoryFullSlug;
});
// Sort the filtered articles by PublicationDate in descending order
filteredArticles.sort((a, b) => {
return new Date(b.content.PublicationDate) - new Date(a.content.PublicationDate);
});
return filteredArticles;
});
// Sort the authors by name:
eleventyConfig.addFilter("sortAuthorsByName", function(authors) {
return authors.sort((a, b) => a.content.Name.localeCompare(b.content.Name));
});
// Pass Trhough Copy
eleventyConfig.addPassthroughCopy({
"./src/public/": "/",
});
return {
dir: {
input: 'src'
},
};
};What have we done here? Let's go one by one:
Initializing
dotenvThis initial line populates env variables into process.env and makes it available in the config file.Add Global Data We're adding the
DOMAINenviroment variable as Global Data, ensuring it's available throughout the project.Filter articles by Author We've defined a new filter to retrieve articles authored by a specific author. This filter will be applied on the Author's page to list all articles authored by that individual. Additionally, the articles will be sorted by PublicationDate in descending order.
Filter articles by Category Similar to the previous filter, here we're filtering articles belonging to a specific Category. This filter will be utilized on the Category's page to list all articles within that particular Category. Once again, the articles are sorted by PublicationDate in descending order.
Sort authors by name This filter enables us to arrange the list of authors alphabetically by their names.
6. Create the
src > _data > metadata.jsonfile #{
"title": "My site",
"language": "en",
"description": "Welcome to my blog site!",
"image": "[fallback-image-for-social-media-goes-here]"
}7. Create the
src > _includes > head.njkfile #<head>
<meta charset="UTF-8">
<meta http-equiv="X-UA-Compatible" content="IE=edge">
<meta name="viewport" content="width=device-width, initial-scale=1.0">
<title>{{ title or metadata.title }}</title>
<link rel="stylesheet" href="/css/styles.css">
<meta name="description" content="{{ description or metadata.description }}">
<link rel="canonical" href="{{ canonical or domain+page.url }}">
{% if noindex == "true" %}
<meta name="robots" content="noindex">
{% endif %}
<meta property="og:title" content="{{ og_title or title or metadata.title }}">
<meta property="og:description" content="{{ og_description or description or metadata.description }}">
<meta property="og:image" content="{{ og_image or metadata.image }}">
<meta name="twitter:card" content="summary_large_image">
<meta name="twitter:title" content="{{ og_title or title or metadata.title }}">
<meta name="twitter:image" content="{{ og_image or metadata.image }}">
</head>This might seem a bit overwhelming, right? It's because we're integrating Nunjucks variables and conditionals (using curly braces) with HTML tags. However, it's just as straightforward and incredible as you saw in the previous code.
For example
<link rel="canonical" href="{{ canonical or domain+page.url }}">generates a canonical link with the canonical URL sourced from the frontmatter data. If that's missing, it constructs a canonical URL by combining the domain (Global Data) with the URL of the current page. BOOM!8. Create the
src > _includes > header.njkfile #<header>
<nav class="header-nav">
<a class="header-home" href="/">My site</a>
<ul class="header-list">
<li class="header-item"><a href="/articles/">Articles</a></li>
<li class="header-item"><a href="/authors/">Authors</a></li>
<li class="header-item"><a href="/categories/">Categories</a></li>
</ul>
</nav>
</header>9. Create the
src > _includes > footer.njkfile #<footer>
© {{ year }} - All Rights Reserved
</footer>10. Create the
src > _includes > layouts > base.njkfile #<!DOCTYPE html>
<html lang="{{ metadata.language }}">
{% include "head.njk" %}
<body>
{% include "header.njk" %}
<main style="flex-grow:1;">
{{ content | safe }}
</main>
{% include "footer.njk" %}
</body>
</html>That seemed a bit weird, didn't it? Let's break it down step by step.
- The
langattribute in the HTML comes from the metadata.json file, where we've set the language.- We utilize
includeto pull in the templates we've created (head,headerandfooter).11. Create the
src > utils > storyblok.jsfile #require('dotenv').config()
module.exports = async function fetchAPI(query, { variables, preview } = {}) {
const res = await fetch("https://gapi.storyblok.com/v1/api", {
method: "POST",
headers: {
"Content-Type": "application/json",
Token: process.env.STORYBLOK_TOKEN,
Version: "published",
},
body: JSON.stringify({
query,
variables,
}),
});
const json = await res.json();
if (json.errors) {
console.error(json.errors);
throw new Error("Failed to fetch API");
}
console.log(json.data)
return json.data;
}This code may sound familiar because we've already covered it in the previous article. Remember, I'm using the
publishedversion, but you might opt for thedraftversion if this template isn't intended for a production site.12. Create your
src > _data > articles.jsfile. #It will generate the global
articlesdata file, which you'll utilize to create your article pages. This is the code for this file:const fetchAPI = require("../utils/storyblok.js");
module.exports = async function getArticles () {
const data = await fetchAPI(`
{
ArticleItems {
items {
full_slug
content {
Body
PublicationDate
Title
Author {
name
fullSlug
}
Category {
name
fullSlug
}
SEO
}
}
}
}
`);
return data?.ArticleItems.items;
}13. Create the
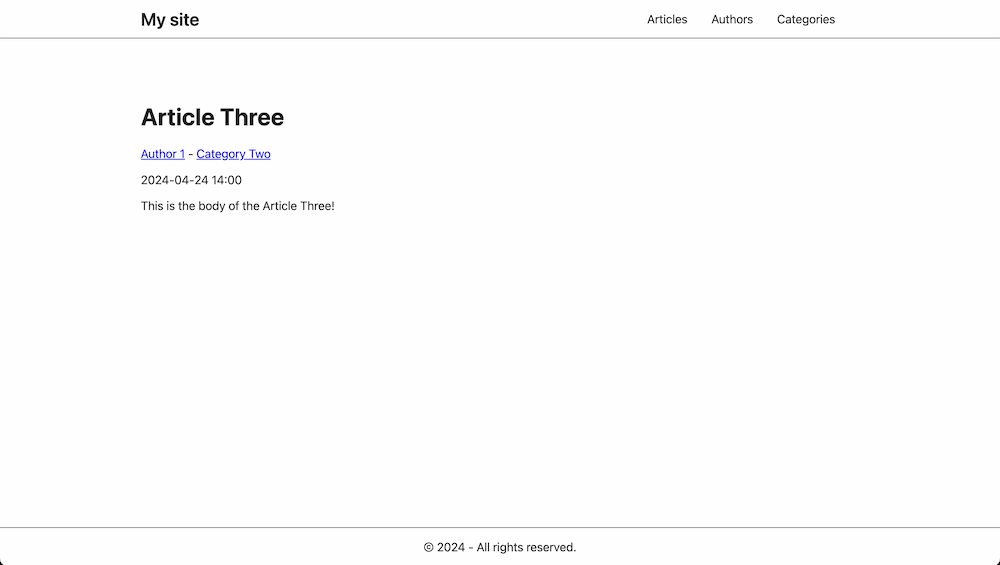
src > article-pages.njkfile #---
pagination:
data: articles
size: 1
alias: article
permalink: "{{ article.full_slug }}/"
layout: layouts/base.njk
templateEngineOverride: njk,md
eleventyComputed:
title: "{{ article.content.SEO[0].title }}"
description: "{{ article.content.SEO[0].description }}"
canonical: "{{ article.content.SEO[0].canonical }}"
noindex: "{{ article.content.SEO[0].noindex }}"
og_title: "{{ article.content.SEO[0].og_title }}"
og_description: "{{ article.content.SEO[0].og_description }}"
og_image: "{{ article.content.SEO[0].og_image.filename }}"
---
<article>
<h1>{{ article.content.Title }}</h1>
<a href="/{{ article.content.Author.fullSlug }}">{{ article.content.Author.name }}</a>
<span> - </span>
<a href="/{{ article.content.Category.fullSlug }}">{{ article.content.Category.name }}</a>
<p>{{ article.content.PublicationDate }}</p>
<div>
{{ article.content.Body | safe }}
</div>
</article>Yes, that's a lot of SEO and Social Media metadata, but it's necessary! You might be wondering why this data is under
eleventyComputedinstead of being set directly, like we did withpermalink.And that's a great question! We can only use variables and shortcodes in
permalinkandeleventyComputed. Therefore, we don't need to set the permalink under eleventyComputed, but the rest of the custom fields must be placed there to ensure they are dynamicly updated."14. Create the
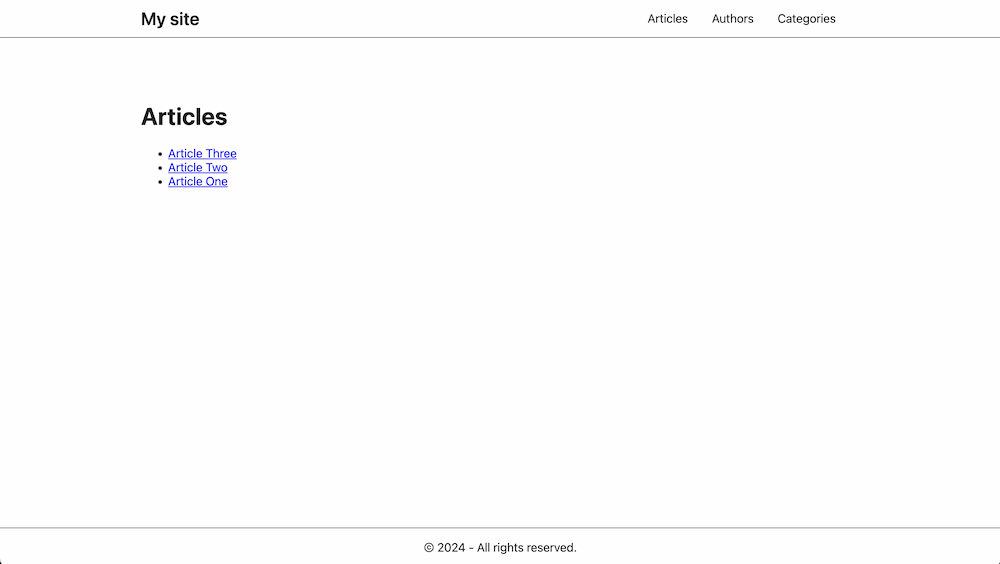
src > articles-list.njkfile #This template will list all the published articles.
---
permalink: "/articles/"
layout: layouts/base.njk
title: "Articles"
description: "This is the list of Articles"
---
<div>
   <h1>Articles</h1>
   <ul>
       {% for article in articles %}
       <li><a href="/{{ article.full_slug }}">{{ article.content.Title }}</a></li>
       {% endfor %}
   </ul>
</div>
15. Repeat steps 12 through 14, but this time creating the files related to
Authors#
- Filename: src > _data > authors.js
const fetchAPI = require("../utils/storyblok.js");

module.exports = async function getAuthors () {
 const data = await fetchAPI(`
 {
   AuthorItems {
     items {
       full_slug
       content {
         Name
         Bio
         Avatar {
           filename
         }
         SEO
       }
     }
   }
 }
 `);
 return data?.AuthorItems.items;
}
- Filename: src > author-page.njk
---
pagination:
   data: authors
   size: 1
   alias: author
permalink: "{{ author.full_slug }}/"
layout: layouts/base.njk
eleventyComputed:
   title: "{{ author.content.SEO[0].title }}"
   description: "{{ author.content.SEO[0].description }}"
   canonical: "{{ author.content.SEO[0].canonical }}"
   noindex: "{{ author.content.SEO[0].noindex }}"
   og_title: "{{ author.content.SEO[0].og_title }}"
   og_description: "{{ author.content.SEO[0].og_description }}"
   og_image: "{{ author.content.SEO[0].og_image.filename }}"
---

<div>
   <div class="author-info">
       <img class="author-avatar" src="{{ author.content.Avatar.filename }}">
       <h1 class="author-name">{{ author.content.Name }}</h1>
   </div>
       <p>{{ author.content.Bio }}</p>
   <h2>Articles by {{ author.content.Name }}</h2>

   {% set targetAuthorFullSlug = author.full_slug %}
   {% set filteredArticles = articles | filterArticlesByAuthor(targetAuthorFullSlug) %}
   <ul>
       {% for article in filteredArticles %}
           <li>
               <article>
                   <h3><a href="/{{ article.full_slug }}">{{ article.content.Title }}</a></h3>
                   <span>Publication Date: {{ article.content.PublicationDate }}</span>
               </article>
           </li>
       {% else %}
           <p>No articles found for this author.</p>
       {% endfor %}
   </ul>

</div>
- Filename: src > authors-list.njk
---
permalink: "/authors/"
layout: layouts/base.njk
title: "Authors"
description: "This is the list of Authors"
---
<div>
   <h1>Authors</h1>
   <ul>
       {% for author in authors | sortAuthorsByName %}
       <li><a href="/{{ author.full_slug }}">{{ author.content.Name }}</a></li>
       {% endfor %}
   </ul>
</div>
16. Repeat steps 12 through 14, but this time creating files related to
Categories#
- Filename: src > _data > categories.js
const fetchAPI = require("../utils/storyblok.js");

module.exports = async function getCategories () {
 const data = await fetchAPI(`
 {
   CategoryItems {
     items {
       full_slug
       content {
         Category
         SEO
       }
     }
   }
 }
 `);
 return data?.CategoryItems.items;
}
- Filename: src > category-page.njk
---
pagination:
   data: categories
   size: 1
   alias: category
permalink: "{{ category.full_slug }}/"
layout: layouts/base.njk
eleventyComputed:
   title: "{{ category.content.SEO[0].title }}"
   description: "{{ category.content.SEO[0].description }}"
   canonical: "{{ category.content.SEO[0].canonical }}"
   noindex: "{{ category.content.SEO[0].noindex }}"
   og_title: "{{ category.content.SEO[0].og_title }}"
   og_description: "{{ category.content.SEO[0].og_description }}"
   og_image: "{{ category.content.SEO[0].og_image.filename }}"
---
<div>
   <h1>{{ category.content.Category }}</h1>

   {% set targetCategoryFullSlug = category.full_slug %}
   {% set filteredArticles = articles | filterArticlesByCategory(targetCategoryFullSlug) %}
   <ul>
       {% for article in filteredArticles %}
           <li>
               <article>
                   <h3><a href="/{{ article.full_slug }}">{{ article.content.Title }}</a></h3>
                   <span>Publication Date: {{ article.content.PublicationDate }}</span>
               </article>
           </li>
       {% else %}
           <p>No articles found for this category.</p>
       {% endfor %}
   </ul>
</div>
- Filename: src > categories-list.njk
---
permalink: "/categories/"
layout: layouts/base.njk
title: "Categories"
description: "This is the list of Categories"
---
<div>
   <h1>Categories</h1>
   <ul>
       {% for category in categories %}
       <li><a href="/{{ category.full_slug }}">{{ category.content.Category }}</a></li>
       {% endfor %}
   </ul>
</div>
17. Create the
Homerelated files #In this case, we need the
Home id. You can find it using the GAPI browser, as I explained in my previous article.
- Once you have the home id, add the variable in the
.envfile:STORYBLOK_API_KEY="[your-storyblok-token-goes-here]"
DOMAIN="[your-website-domain-goes-here]"
+ HOME_ID="[your-home-id]"
- Create the
src > _data > home.jsfile and add the following code in it:require('dotenv').config()
const fetchAPI = require("../utils/storyblok");
module.exports = async function getHome () {
const data = await fetchAPI(`
{
PageItem(id: "${process.env.HOME_ID}") {
content {
Heading
Subtitle
Highlights {
fullSlug
name
content
}
SEO
}
}
}
`);
return data?.PageItem;
}
- Create the
src > index.njkfile:---
pagination:
data: home
size: 1
permalink: "/"
layout: layouts/base.njk
eleventyComputed:
title: "{{ home.content.SEO[0].title }}"
description: "{{ home.content.SEO[0].description }}"
canonical: "{{ home.content.SEO[0].canonical }}"
noindex: "{{ home.content.SEO[0].noindex }}"
og_title: "{{ home.content.SEO[0].og_title }}"
og_description: "{{ home.content.SEO[0].og_description }}"
og_image: "{{ home.content.SEO[0].og_image.filename }}"
---
<h1>{{ home.content.Heading }}</h1>
<p class="home-subtitle">{{ home.content.Subtitle }}</p>
<h2>Highlighted Articles</h2>
<ul>
{% for article in home.content.Highlights %}
<li><a href={{ article.fullSlug }}>{{ article.content.Title }}</a></li>
{% endfor %}
</ul>18. Create the
src > public > css > styles.cssfile #/* Colors */
:root {
--darkgray: #202124;
--purple: #713973;
--white: #FFF;
}
body {
background-color: var(--white);
color: var(--darkgray);
display: flex;
flex-direction: column;
font-family: system,-apple-system,system-ui,BlinkMacSystemFont,Roboto-Light,sans-serif;
font-size: clamp(1.1em, calc(0.25vw + 0.8em), 1.25em);
margin: 0;
min-height: 100vh;
padding: 0;
}
header {
display: flex;
justify-content: space-between;
border-bottom: 1px solid var(--darkgray);
}
footer {
border-top: 1px solid var(--darkgray);
text-align: center;
padding: 1em;
}
main {
flex-grow: 1;
margin: 4em auto 0 auto;
width: min(60em, 90%);
}
.header-home {
text-decoration: none;
font-size: 1.5em;
font-weight: 600;
color: var(--darkgray);
&:hover {
color: var(--purple);
}
}
.header-nav {
display: flex;
align-items: center;
width: min(60em, 90%);
margin: 0 auto;
}
.header-list {
margin-right: 1em;
padding: 0;
list-style: none;
float: left;
margin-left: 1em;
display: flex;
justify-content: flex-end;
flex-grow: 1;
list-style: none;
}
.header-item {
font-size: 1em;
& a {
margin: 0 1em;
color: var(--darkgray);
text-decoration: none;
&:hover {
color: var(--purple);
}
}
}
.author-avatar {
width: 75px;
}
.author-name {
margin-left: 1.5em;
}
.author-info {
display: flex;
flex-direction: row;
}
p:empty {
display: none;
}
Run it locally #
You're nearly finished! With your content in Storyblok and your code stored in a local repository, it's time to run it locally and ensure everything appears as intended.
npm start
Executing this command will run Eleventy locally, making your brand new (local) site accessible at port 8080. If port 8080 is already in use, the correct port will be displayed in the console.
Demo and Template Repository #
You can see this blog site in action here: https://11ty-storyblok.netlify.app
In addition, you have all the code described in this tutorial in this template repository: https://github.com/guaca/11ty-storyblok-template/. So, you can create your own blog site by clicking the "Use this template" button.
What's next? #
This tutorial has guided you through configuring and building a blog site, utilizing Storyblok for data storage and Eleventy for page generation. Once completed, you can deploy your Eleventy project to your preferred Jamstack hosting service. By setting up appropriate workflows and hooks, you can ensure that your site updates automatically whenever you publish a new story in Storyblok.
You have all these steps defined in this article.
Can I use the Storyblok Visual Editor with Eleventy? #
Long answer short? Yes but it's not straightforward.
Long answer: Yes, you can leverage it by configuring an edge function to refresh the API/GAPI data from Storyblok upon updates. Eleventy generates data during build time. Consequently, even after saving new data, the data won't be updated in the Visual Editor preview unless the edge function rebuilds it.
Storyblok's visual editor seamlessly integrates with other frameworks like Next or Nuxt, allowing you to observe content updates instantly, even without saving changes. However, this functionality is not supported by static site generators.
In the next article in this series, I will use Netlify Edge functions to leverage the Storyblok Visual Editor to make working with the editor easier and more intuitive. Stay tuned!